Closed Testing Setup: Configure Your Google Play Testing Track
By TesterBee QA Team · Last updated: July 2026 · 4 min read
To invite testers, configure a Closed Testing track in the Google Play Console to upload your AAB, set tester access, configure countries, and submit for Google's review. The setup takes under five minutes.
From our experience: After helping over 1,000 Android developers pass Google's 14-day closed testing requirement, we found that 30% of developers make a fatal mistake in the Play Console setup — usually by restricting countries and accidentally locking out their own testers. This guide shows the exact, fail-proof setup we require to guarantee all 12 testers can access your app.
If you are unfamiliar with Google's policy, read our overview of the Google Play Closed Testing requirement first to understand the 12-tester, 14-day rule.
Step 1: Navigate to the Testers tab in Closed Testing
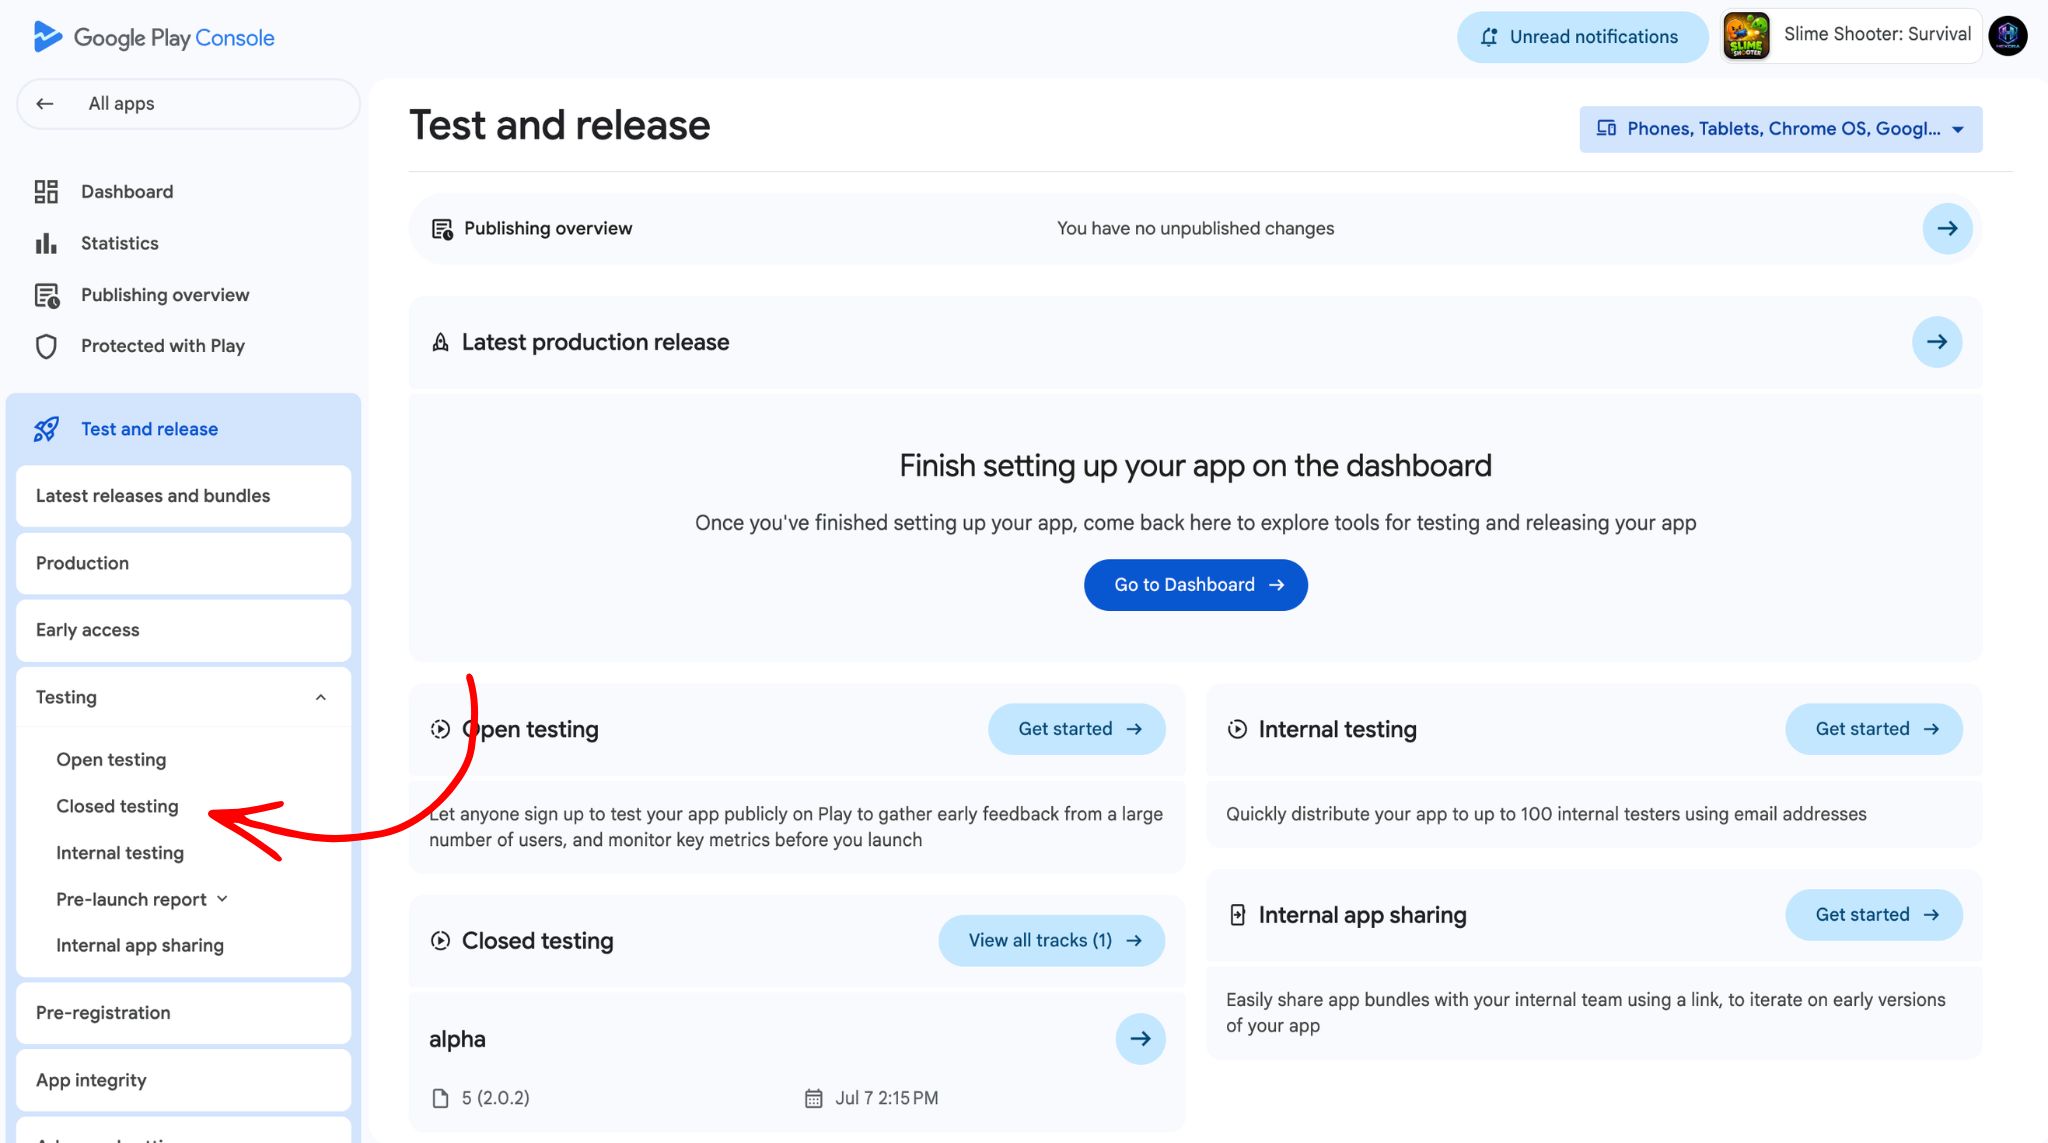
Open the Google Play Console, select your app from the dashboard, then follow this path:
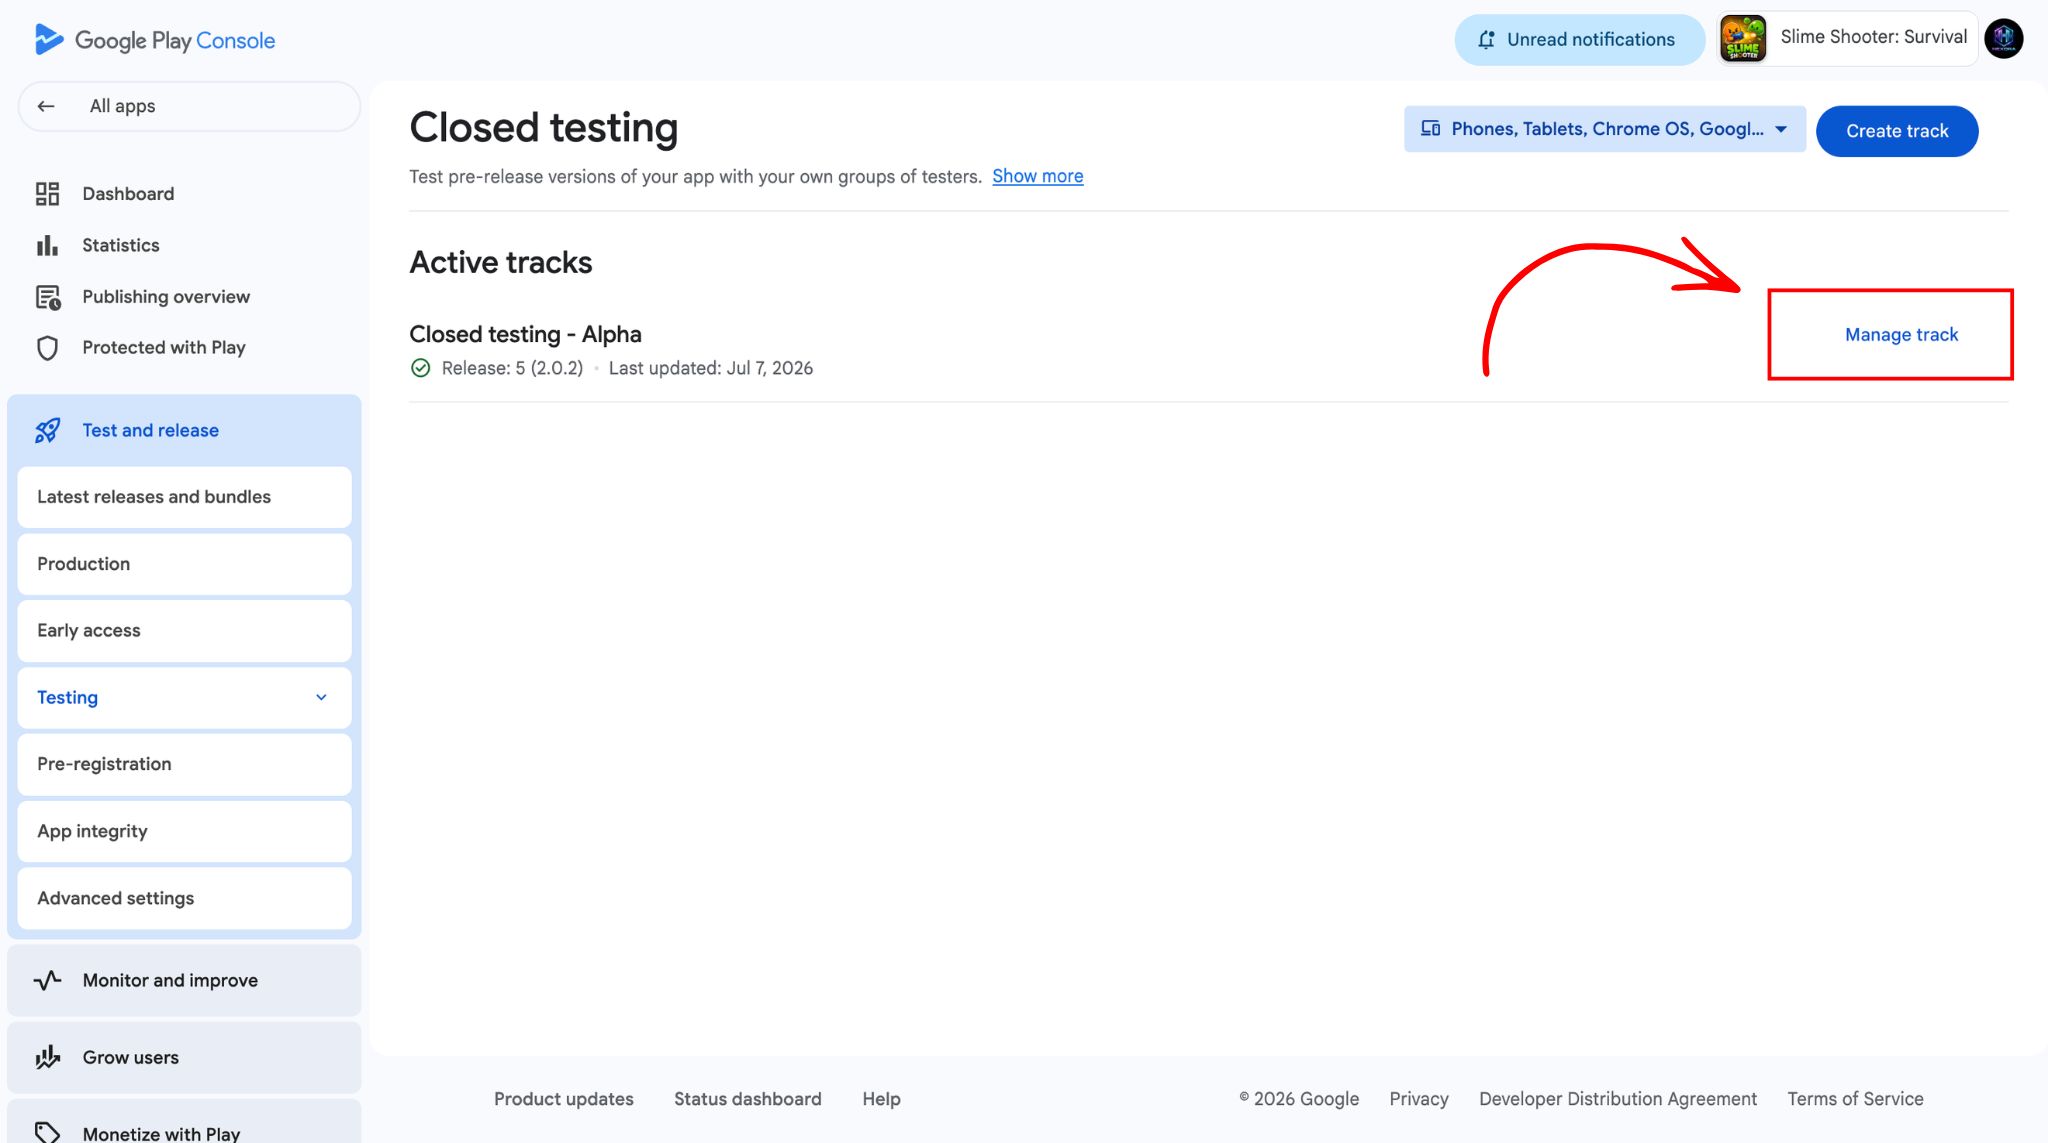
If you have not created a closed testing track yet, click Create track and select Closed testing. If your app already has a track (e.g., Alpha), find it in the list and click Manage track.
Step 2: Add your Google Group as testers
On the Testers tab, you will see options for how testers can join your closed test. Follow these steps:
- Select the Google Groups option. This is the best method for managed tester groups because it lets you add or remove testers without modifying your Play Console settings. Google Groups also supports email-based opt-in links, which testers use to join your test from their Android device.
- In the Email addresses field, enter the email address for your Google Group. (If you are using TesterBee to pass the 12-tester requirement, enter
[email protected]here as shown in the screenshot). - You can also add your own Google Group if you have additional testers. Multiple groups are supported — just separate each email with a comma or add them on separate lines.
- Click Save to apply the tester group configuration.
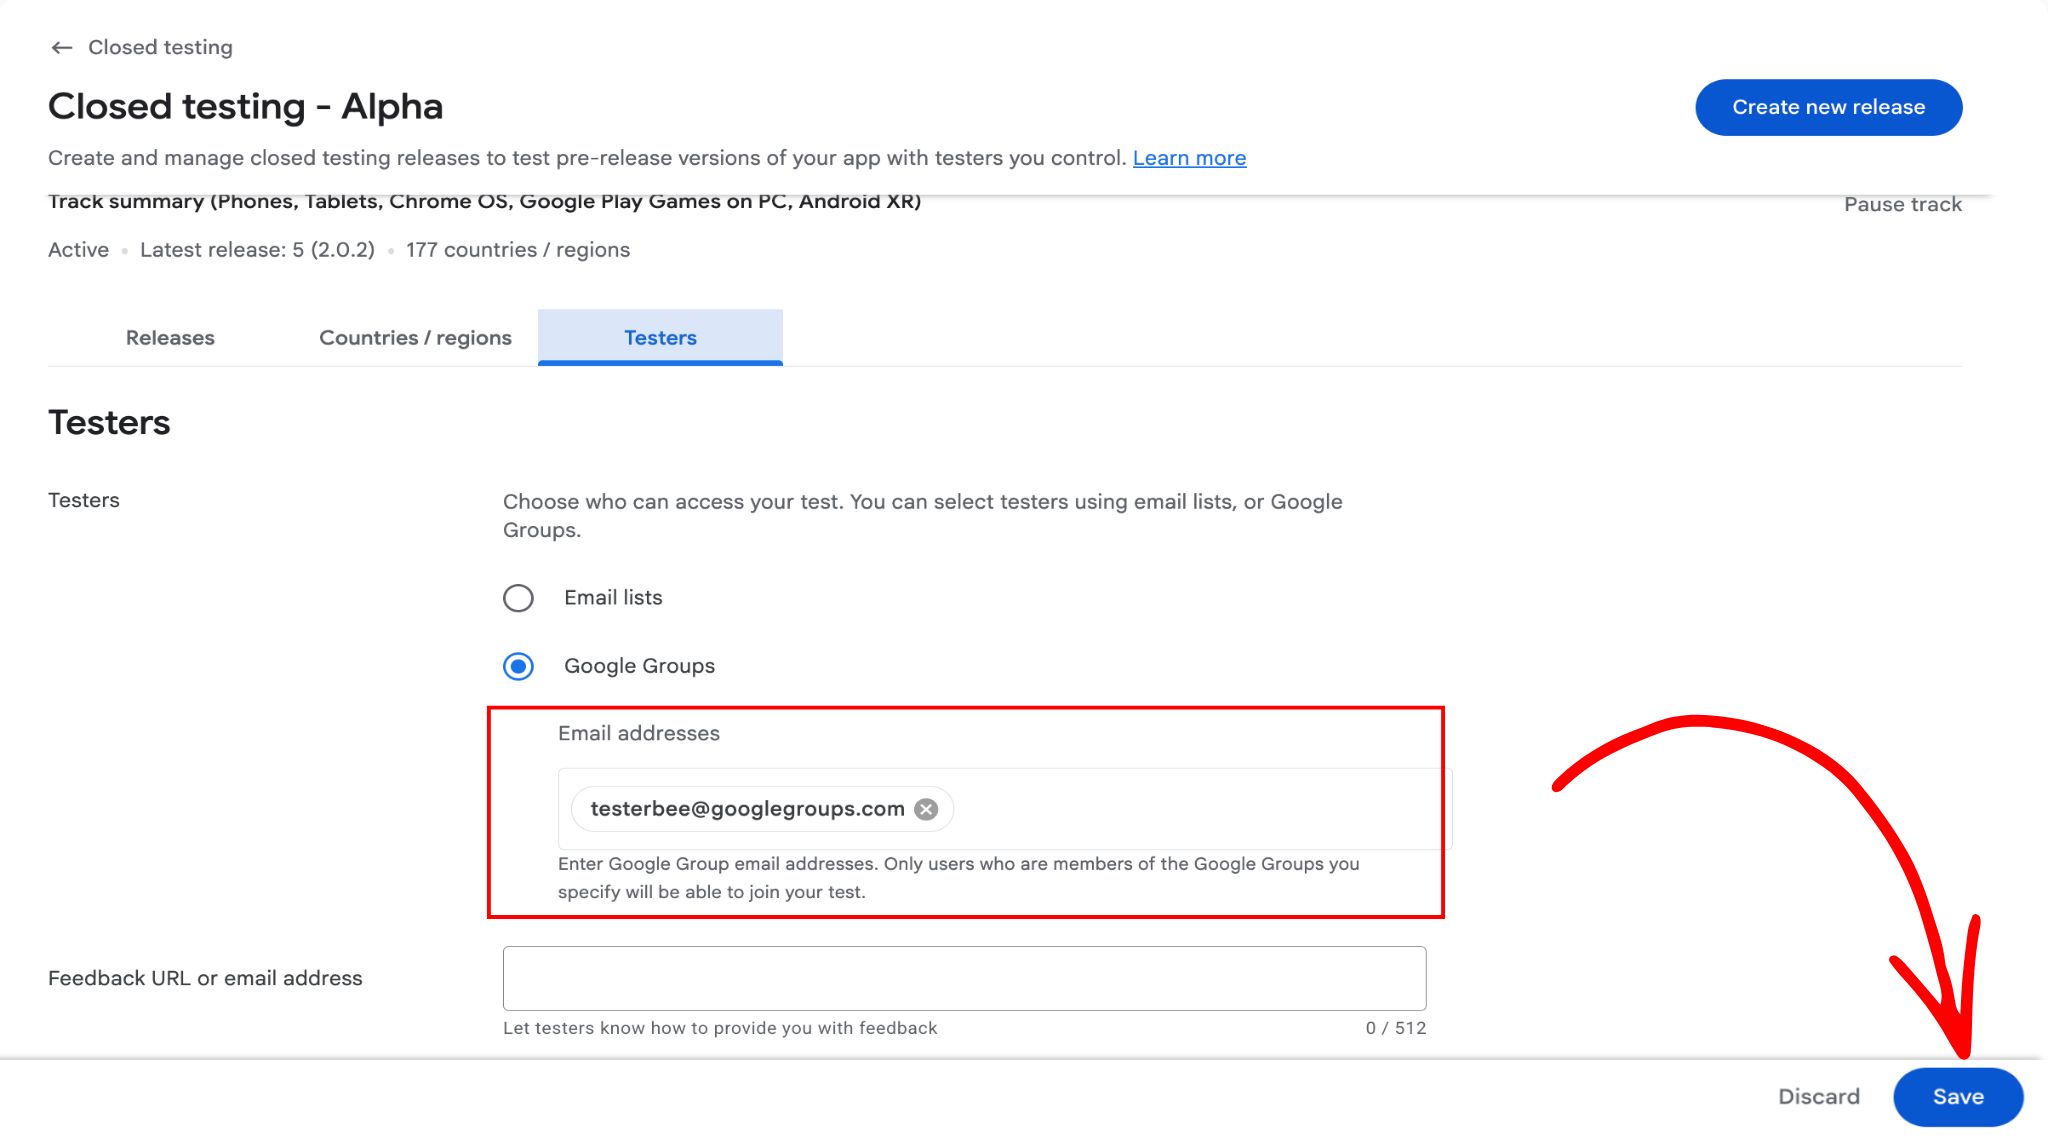
Why Google Groups? Unlike email lists, Google Groups gives you an opt-in URL you can share. Testers click the link, sign in with their Google account, and accept the invitation — no manual email invites needed. Google Groups also support adding members after the test has started without requiring a Play Console update.
Step 3: Configure available countries
After saving your tester group, click the Countries/regions tab. This setting determines which countries your closed test is available in. Testers must be in a supported country to access your app through the testing track.
Select All countries to make your closed test available worldwide, then click Save. This is the recommended setting — TesterBee testers are distributed across multiple countries, and restricting availability may prevent some testers from accessing your app.
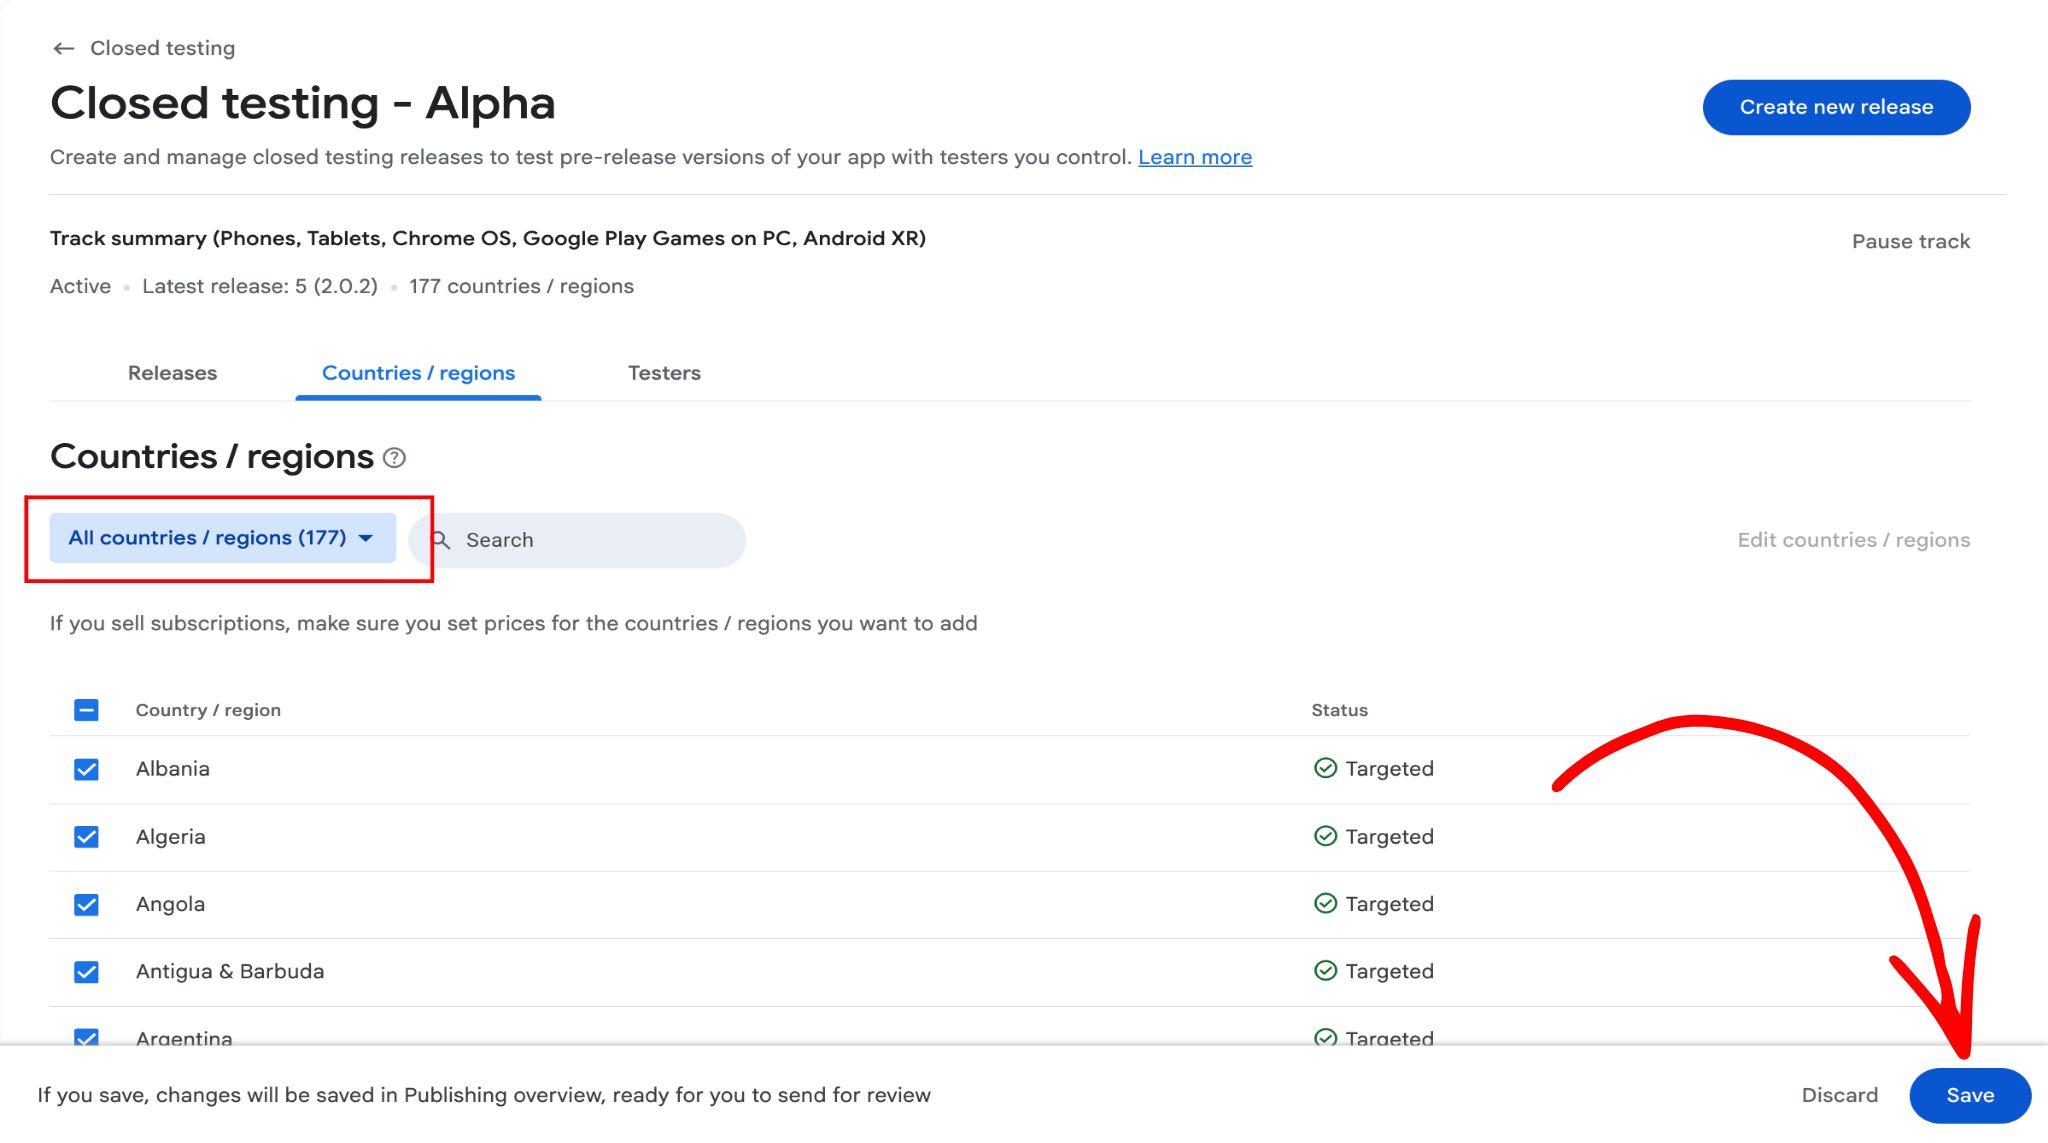
If you restrict countries: Google will not count testers from excluded countries toward your 12-tester requirement. A tester in India cannot access your app if you only selected "United States." This is a common reason for "not enough testers" rejections — developers accidentally limit availability to one country and do not realize half their testers cannot join.
Step 4: Submit changes for review
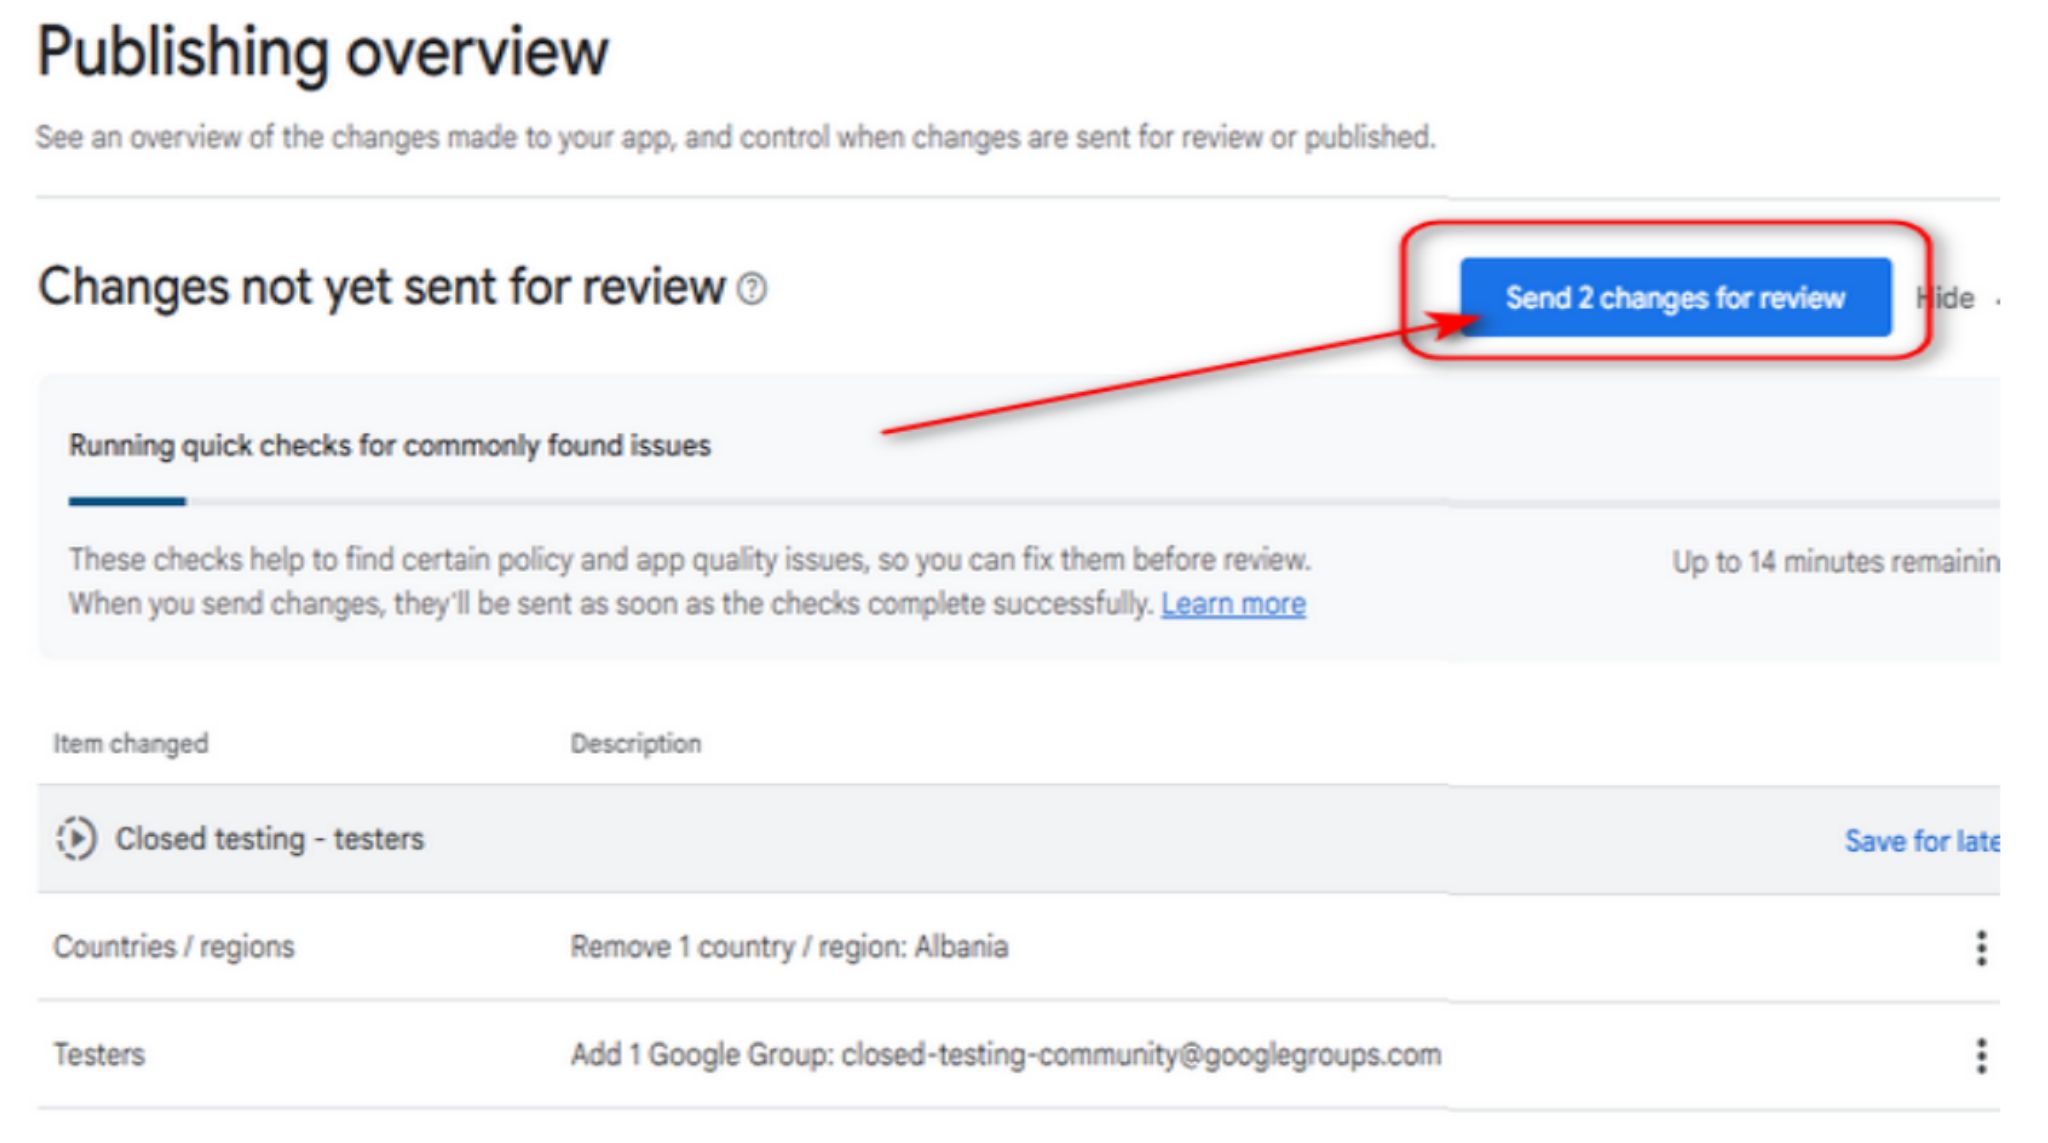
Once your tester group and country settings are saved, navigate to Publishing overview from the left sidebar. You will see your pending changes listed — these are the modifications you have made to your closed testing track.
Click the Send changes for review button (the exact number of changes on the button will vary) to submit your closed testing track for Google's approval. This is a required step — your testers cannot access the app until Google approves the changes.
Note: The screenshot below shows example changes from a different test run. In your console, the changes list should show the Google Group email you added and your country updates.
Review timeline
- First-time app submission: Can take 2-7 days for initial review.
- Updates to an already-approved app: Usually approved within a few hours.
- Tester list changes only: Typically processed within minutes.
What happens after you submit
After Google approves your changes, your closed testing track goes live. Here is what to do next:
- Share the opt-in URL with testers. From the Testers tab, copy the "Opt-in URL" link and share it with your testers. TesterBee automatically delivers this link to your assigned testers — no manual sharing needed.
- Confirm testers are joining. Check the Testers tab after 24 hours to see how many testers have accepted the invitation and installed your app. TesterBee monitors this daily and replaces testers who do not join within 48 hours.
- Monitor feedback. Once testers start using your app, they will submit feedback through TesterBee's dashboard. Review feedback daily and push updates as needed during the 14-day period.
- Track the 14-day clock. The 14-day requirement starts when your 12th tester installs your app, not when you submit for review. Use our free closed testing calculator to track your timeline.
Common setup mistakes to avoid
Using email lists instead of Google Groups
Email lists require manually typing each tester's Gmail address into Play Console. If a tester drops out, you have to edit the list and resubmit for review. Google Groups are far more efficient — add or remove members from the group itself without touching Play Console.
Forgetting to click Send changes for review
Saving changes within the Testing section only stages them. They do not take effect until you go to Publishing overview and click Send changes for review. Developers frequently save their tester settings, assume testers can now join, and wonder why nobody is showing up. Check Publishing overview for any pending changes.
Restricting countries and blocking testers
Selecting only your home country in the Countries/regions tab prevents testers from other regions from accessing your app. Always select All countries unless you have a specific compliance reason to restrict availability. TesterBee testers span multiple countries — restricting availability will reduce your effective tester count.
Uploading an APK instead of AAB
Google Play now requires the Android App Bundle (AAB) format for new apps. APK uploads are still accepted for existing apps but are being phased out. If you are building with Android Studio, Flutter, React Native, or Unity, make sure your build outputs an AAB file, not an APK. See our framework-specific build guide for exact commands.
Your track is set up — now get your 12 testers
Once your closed testing track is configured with [email protected], TesterBee matches your app with 12 real Android testers within 24 hours. Testers install your app on physical devices, use it daily for the full 14 days, and submit structured feedback. If Google rejects your production access application due to tester engagement, you get a full refund.
Get 12 testers now