How to Get Free Google Play Closed Testing with TesterBee (Step-by-Step Guide)
Learn how to get free Google Play closed testing using TesterBee. Earn coins by testing apps, receive testers, and meet Play Console requirements without paying upfront.
Need testers who stay active for all 14 days?
TesterBee matches you with 12 real Android testers in under 24 hours. Refund if Google rejects you over tester engagement.
On this page
- 01What Is TesterBee Free Public Testing?
- 02Step 1: Download the App and Choose Free Public Testing
- 03Step 2: Enter Your App Details and Add the Google Group
- 04Step 3: Earn Coins by Testing Other Apps
- 05Step 4: Receive Testers for Your App
- 06Why Developers Choose Free Public Testing
- 07How do I get more testers using the free plan?
- 08Which should I choose: free public testing or paid private testing?
- 09Frequently Asked Questions
- 10How the TesterBee coin economy works
- 11What makes a good test app in the Free Public Testing marketplace
- 12What happens after your 14-day testing period ends
- 13Related resources
Getting enough testers for Google Play closed testing can be difficult, especially for indie developers and startups with limited budgets. TesterBee solves this problem by offering a Free Public Testing system where developers help each other and earn testing credits.
Free Public Testing is available exclusively through the TesterBee Android app. Download it from Google Play to get started:
Download on Google PlayInstead of paying for testers, you can test other apps, earn coins, and use those coins to receive testers for your own Android app. This guide walks through every step of the process — all from within the TesterBee app.
What Is TesterBee Free Public Testing?
TesterBee's Free Public Testing allows developers to participate in a community-driven testing program. Every time you test another developer's app and complete the required check-in, you earn coins. Those coins are then used to bring testers to your own app.
Benefits
- 100% free to start — no upfront payment required
- Earn coins by testing other apps
- Get real testers for your Android app
- Designed specifically for Google Play closed testing requirements
- Flexible — test as much or as little as you want
Step 1: Download the App and Choose Free Public Testing
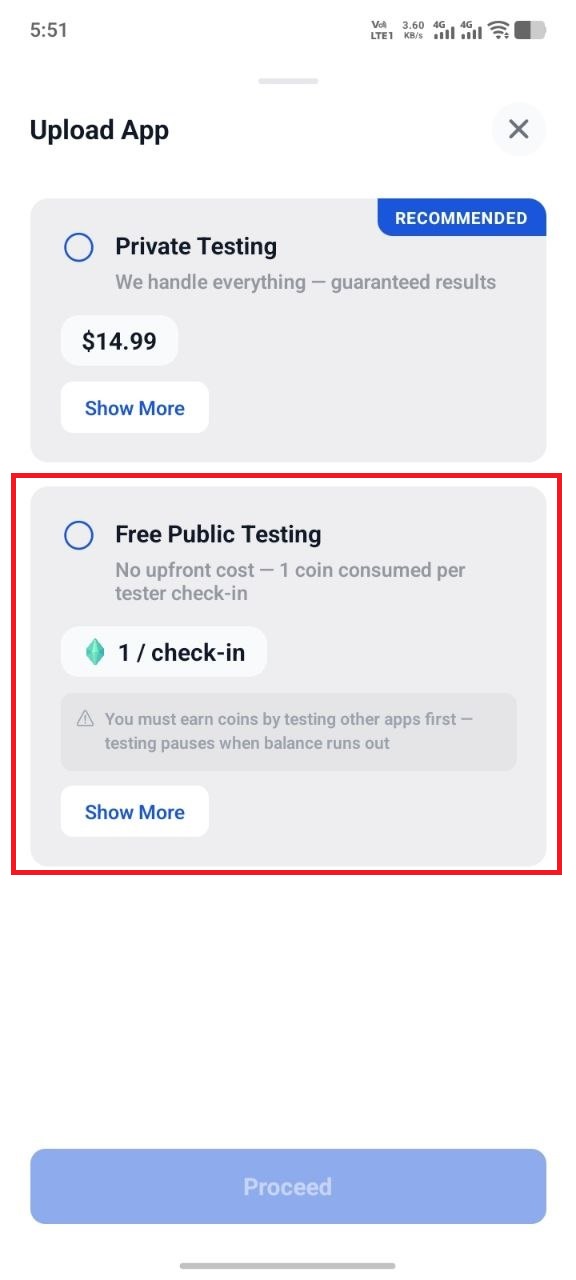
Free Public Testing is only available through the TesterBee Android app. Download TesterBee from Google Play, create your account, and tap Upload App. The first thing you will see is the testing method selection screen.
Choose Free Public Testing. Unlike Private Testing ($14.99 — a fully managed service), Free Public Testing has no upfront cost. Instead, 1 coin is consumed for every tester check-in on your app, and you earn coins by testing other apps. Your campaign continues as long as you have sufficient coins in your balance.
Step 2: Enter Your App Details and Add the Google Group
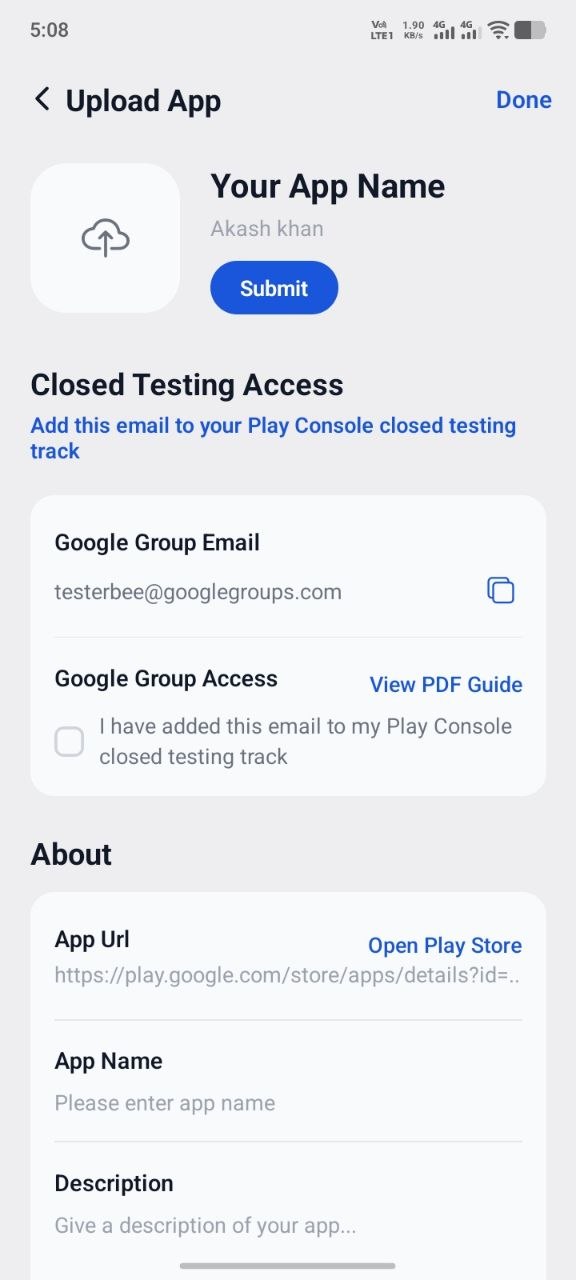
After selecting Free Public Testing, you will be taken to the app details screen. Here you need to provide:
- Google Play URL — the Play Store link to your app
- App Name — your app's name as it appears on the Play Store
- Description — a short summary of what your app does
- App Icon — upload your app's icon
Next, under Closed Testing Access, you will see the Google Group email: [email protected]. Copy this email, go to your Google Play Console, and add it to your closed testing track's tester list. Then return to the TesterBee app and check the confirmation box: "I have added this email to my Play Console closed testing track." This allows eligible testers to access your app through the Play Store.
Step 3: Earn Coins by Testing Other Apps
Browse available apps in the TesterBee marketplace and participate in testing. As you complete check-ins and testing tasks, coins are added to your account balance. The more you contribute to the community, the more testing capacity you unlock for your own app. This creates a fair, sustainable ecosystem where everyone benefits.
Step 4: Receive Testers for Your App
Once your app is active in the Free Public Testing pool, other developers can discover and test it. Each tester check-in consumes one coin from your balance, making the process fair and sustainable for everyone. Keep earning coins by testing other apps to ensure uninterrupted testing for your own campaign.
Why Developers Choose Free Public Testing
Many developers prefer TesterBee's free model because it provides significant advantages over traditional paid testing services:
- Lower costs compared to hiring testers or using paid services
- A community of active Android developers who understand the testing process
- Simple earn-and-use credit system — test apps, earn coins, receive testers
- Flexible testing without monthly commitments or long-term contracts
- Purpose-built for Google Play closed testing workflows and requirements
How do I get more testers using the free plan?
Complete Your App Profile
A professional icon, clear screenshots, and a compelling description increase the likelihood that other developers will choose to test your app. First impressions matter — even in a testing community.
Stay Active in the Community
Regularly testing other apps helps maintain a healthy coin balance and keeps your own campaign running. Active participants tend to receive more testers in return.
Keep Your Coin Balance Positive
If your balance reaches zero, new tester check-ins may stop until you earn additional coins. Monitor your balance and test apps regularly to keep your campaign running smoothly.
Which should I choose: free public testing or paid private testing?
| Feature | Free Public Testing | Private Testing |
|---|---|---|
| Upfront Cost | Free | Paid |
| Earn by Testing | Yes | No |
| Coin System | Yes | No |
| Hands-off Experience | No | Yes |
| Available on | Android app only | Web + Android app |
| Best For | Indie developers, students, startups | Businesses wanting managed testing |
Frequently Asked Questions
Where can I access Free Public Testing?
Free Public Testing is available exclusively through the TesterBee Android app on Google Play. It is not available on the web dashboard. Download the app, create your account, and start earning coins by testing other apps.
Is TesterBee Free Public Testing really free?
Yes. There is no upfront payment required. You earn coins by testing other apps and spend those coins to receive testers for your own app. It is a community-driven model where participation is the currency.
How many coins are required?
Currently, 1 coin is consumed for each tester check-in on your app. The exact number of coins needed depends on how many tester check-ins your campaign receives.
Can I switch to paid testing later?
Yes. If you prefer not to earn coins manually, you can choose Private Testing at any time for a fully managed experience. Many developers start with Free Public Testing and switch to Private Testing as their needs grow.
Does this help with Google Play closed testing?
Yes. TesterBee is designed specifically to help Android developers complete the Google Play closed testing phase by connecting them with a community of real testers who help meet the 12-tester, 14-day requirement.
Ready to start free testing?
Free Public Testing is only available through the TesterBee Android app. Download it now and start earning coins.
Download TesterBee on Google PlayOr learn more about getting 12 testers for Google Play.
How the TesterBee coin economy works
The coin system is what makes Free Public Testing sustainable. Every time you test another developer's app and complete the required check-in, you earn one coin. When another developer tests your app, one coin is deducted from your balance. It is a one-to-one exchange — one test given, one test received.
Here is how the coin flow works in practice:
- Browse available apps in the marketplace tab of the TesterBee app. You will see apps sorted by how recently they need testers.
- Install and use the app — download it from the Google Play link provided, open it, and explore its features.
- Complete the check-in — after using the app, confirm your check-in in the TesterBee app. This is what triggers the coin credit to your account.
- One coin earned — your balance increases by one. You can now use this coin to receive one tester check-in on your own app.
- Repeat — the more apps you test, the more coins you accumulate, and the more testing capacity you unlock for your own campaign.
The system is designed so that active participants always have enough coins. If you test five apps in a day, you earn five coins — enough to cover five tester check-ins on your app. There is no daily limit and no minimum commitment. You control your own pace.
What happens if you run out of coins?
If your coin balance reaches zero, your app remains visible in the marketplace, but new tester check-ins will not be processed until you earn more coins. Your app is not removed — it simply pauses until your balance is replenished. This is why we recommend keeping a buffer of at least 5-10 coins so your campaign runs uninterrupted while you test other apps at your convenience.
What makes a good test app in the Free Public Testing marketplace
Not all apps attract the same level of tester interest. Based on TesterBee marketplace data, here is what makes testers more likely to choose your app:
- A clear, professional app icon. Testers see your icon before anything else. A blurry or generic icon signals low effort and gets skipped. Use a high-resolution, distinctive icon that represents your app well.
- A one-sentence description that hooks interest. Your app description in TesterBee is not your Play Store listing — it is a short preview that testers scan in under three seconds. Lead with what your app does and why it is interesting. "A minimalist habit tracker with streak rewards" works better than "An application for tracking daily habits and routines."
- Screenshots that show real functionality. Testers want to know what they are installing. Upload 2-3 screenshots that show your app's main screens — not just the onboarding. Apps with screenshots get significantly more tester interest than apps without them.
- A stable, functional build. If your app crashes on launch or has a broken onboarding flow, testers will abandon it immediately — and your coin is still consumed for that check-in. Test your build thoroughly before listing it in the marketplace.
- An app that does something useful. Testers are other developers. They gravitate toward apps that are interesting, novel, or solve a real problem. A well-executed niche tool will attract more testers than a generic to-do list app.
How to keep testers engaged beyond the initial install
Getting a tester to install your app is step one. Keeping them engaged for the full 14 days is what actually counts toward your Google Play requirement. Here are practical strategies:
- Add daily content or challenges. If your app has any kind of daily element — a tip, a quote, a streak counter, a new piece of content — testers have a reason to open it each day. Even a simple "Day X of testing" screen with a daily message keeps testers coming back.
- Send a welcome message. The TesterBee app allows communication between developers and testers. A quick "Thanks for testing, here is what to look for" message sets expectations and builds rapport.
- Respond to feedback within 24 hours. When a tester reports a bug or makes a suggestion, acknowledge it quickly. Testers who feel heard are far more likely to stay engaged for the full testing period.
What happens after your 14-day testing period ends
Once your 14-day testing period is complete and you have maintained 12 active testers, the next step is applying for production access. Here is the process:
- Verify your testing data. Log into Google Play Console and confirm that your Closed Testing track shows at least 14 days of continuous testing with 12 or more testers opted in. Check the engagement metrics — make sure there are no gaps that could raise questions during review.
- Prepare your production access application. Google will ask you questions about your testing period — what feedback you received, what changes you made, and why you believe your app is ready for production. Answer these honestly and specifically. Vague answers like "testers liked it" are weaker than "we fixed three crash bugs reported by testers and improved the onboarding flow based on feedback."
- Submit and wait. Approval typically takes 2-7 business days. During this time, your Closed Testing track can remain active — testers can continue using your app while Google reviews your application.
- If approved: You can publish your app to production immediately. Congratulations — your app is now live on Google Play.
- If rejected: Read the rejection reason carefully, address the specific issues, run another testing period, and reapply. Do not submit the same application twice without making changes.
The most common reason for rejection at this stage is insufficient evidence that real testing occurred. Make sure you can point to specific feedback, specific changes you made, and specific evidence of tester engagement. Our Google Play testing checklist covers everything you need before you apply.
Related resources
- Every free method to get 12 testers ranked — see how Free Public Testing compares to Reddit, Discord, and other free options
- TesterBee Private Testing ($14.99) — fully managed 12-tester service with 14-day engagement guarantee
- How to Get 12 Testers: Complete Guide — compare every testing method side by side
- Google Play Closed Testing official documentation — Google's requirements for the 12-tester, 14-day Closed Testing mandate

Senior full stack developer specializing in Laravel, React, and Firebase. Helped 1,200+ Android developers pass Google Play Closed Testing and publish apps. Expert in Play Console, production access, and Android app publishing.
Get 12 testers into your closed test in 24 hours
Matched Android testers who open your app every day of the 14-day window, so your production access review has real engagement to look at.
Start your closed testRelated articles
Hire Android App Testers for Closed Testing: Safety, Costs & Vetting Guide (2026)
Planning to hire Android app testers for Google Play closed testing? Compare freelance marketplaces, test-swap communities, and managed tester pools. Discover the 6-point vetting checklist, how to avoid bot farms and emulator traps, and how to guarantee 14 consecutive days of compliance.
Last-Minute Google Play Testing: Can You Expedite Closed Testing & What to Do When Behind Schedule (2026)
Behind schedule on your Google Play release deadline? Learn if you can expedite the 14-day closed testing period, the fatal mistakes rushed developers make, and the exact emergency playbook to hit production with zero wasted days.
Why Google Play Closed Testing Fails: 10 Common Reasons, What Happens Next & How to Fix It (2026)
Google Play closed testing failed, clock reset, or production access rejected? Discover the 10 most common technical, telemetry, and configuration failure reasons, what happens to your app, and the exact roadmap to pass on your next attempt.